Packraft Safety Equipment – Ambassador Luc Mehl’s Approach to Safety Equipment.
Disclaimer: The views and opinions expressed in this article are those of the authors and do not necessarily reflect the official policy or position of Alpacka Raft. Alpacka Raft’s official policy and position on safety equipment and product use is set forth in our product manuals and our Safety Warning. Examples of analysis performed within this article are only examples of the authors decision-making process and are highly fact dependent. The examples should not be relied on by any reader for their personal safety equipment choices.
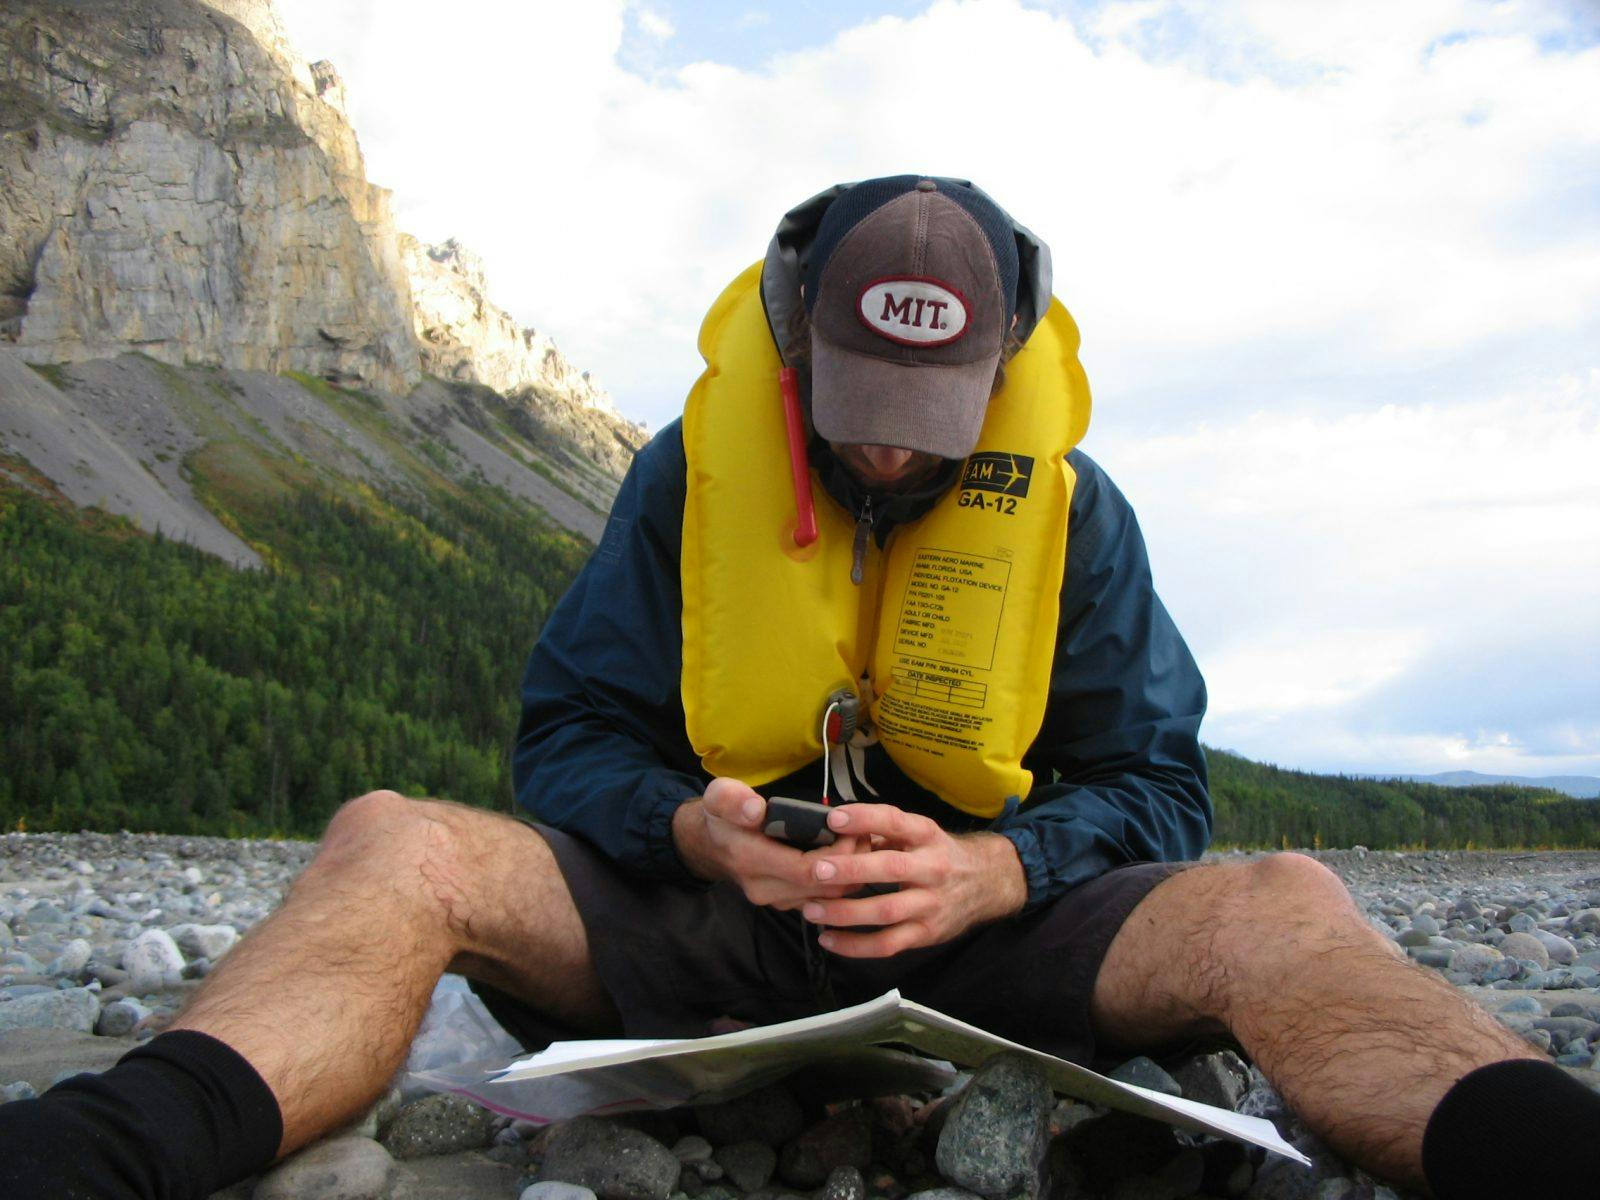
Story, graphics, and photos by Luc Mehl. Feature photo: Graham Kraft with foam PFD, 370-mile Logan Traverse.
Alpacka rafts were originally built by and for backpackers and hiking enthusiasts who wanted deeper access to wild lands. As the boats evolved, so did the users, and many of us discovered a new interest in paddling water for the sake of water, not just as a way to extend a backpacking trip.
When we start to think of rivers as trails, it is easy to underestimate the importance of river safety equipment. The dominant cause of packrafting fatalities has been insufficient safety equipment, especially PFDs (aka “personal floatation device”). The right thing to do is carry a complete safety kit, but realistically, most of us will be travelling light, cutting corners and carrying minimal safety equipment.
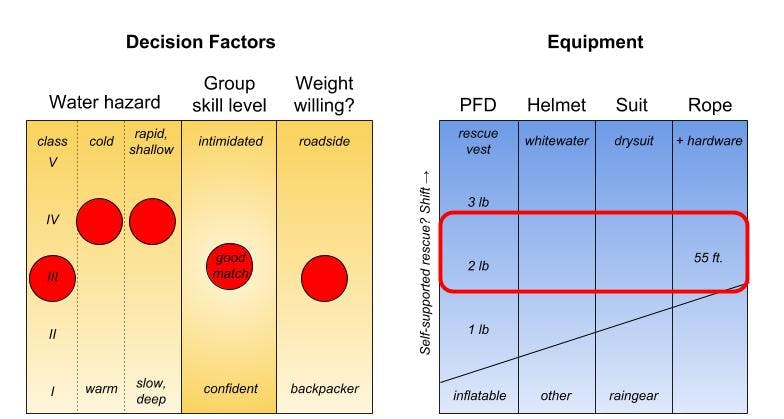
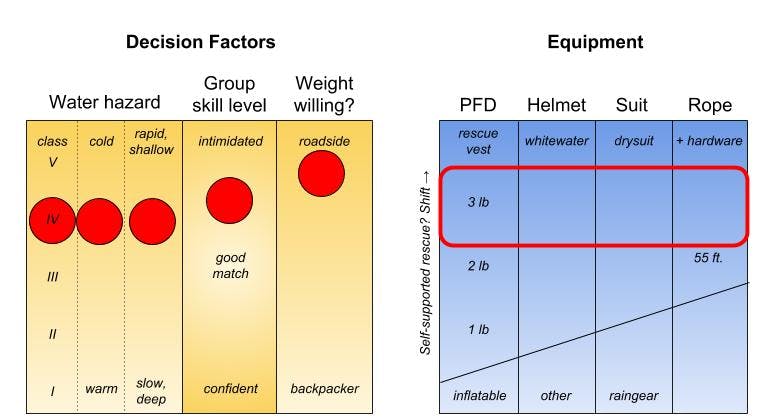
Several factors go into my decision regarding what safety equipment to bring on a remote trip. I’ve created a decision matrix to help convey these factors. This matrix is not intended to be definitive, but rather, is meant to provide a framework for discussion with your trip partners. If nothing else, going through this exercise will help you identify and acknowledge the risks associated with your intended trip.
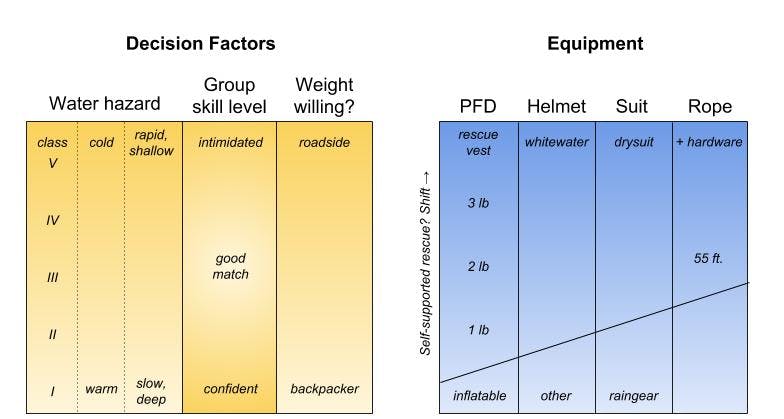
To use this decision matrix, identify where your destination falls within the Decision Factor (DF) grid (yellow), then use the DF placement to identify what safety equipment to carry (blue). Let’s use a trip to the Brooks Range, Alaska, as an example.
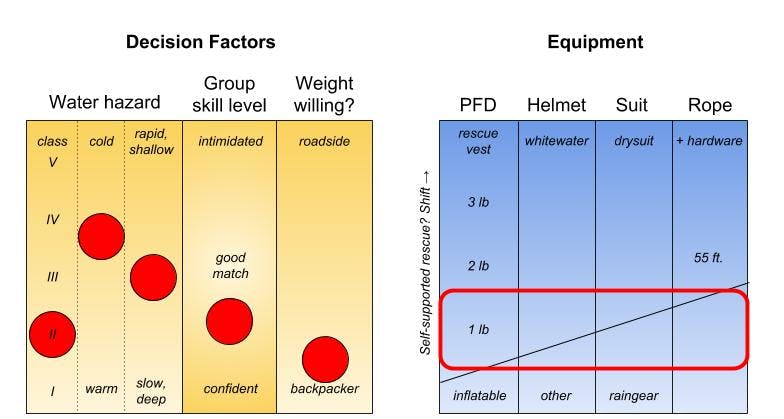
For the big Gates of the Arctic rivers, Alatna, Noatak, Ambler, etc., I identify the water hazard as Class II, pretty cold, and not particularly shallow or rocky. My group consists of Class III boaters, so the group skill level plots on the confident end of the spectrum.
Finally, since we will be carrying two weeks of supplies, we are very weight conscious and hoping to carry as little safety gear as possible. An average of the DF values corresponds with a ~1 lb pfd, possible helmet, unlikely drysuit, and no throw rope. If the group was less experienced or planning to paddle some steeper tributaries, that would bump the equipment up to helmet and drysuit.
Decision Factors and Equipment categories in more detail.
Decision Factors: Water hazard
For established runs, use guide books or online forums to determine the expected Class rating. Other factors to consider are temperature (a swim in cold water has much higher consequence) and whether there are any shallow/rock hazards. For remote runs, make an informed guess based on gradient (elevation drop per mile/km) and water texture as seen in satellite or aerial imagery.
Decision Factors: Group skill level
The center of this spectrum is where your group is appropriately skilled for the objective. If I’m planning a remote trip, I am more inclined to seek objectives that are below my skill level (confident). A group with mixed skills should discuss everyone’s comfort level scouting and portaging.
Decision Factors: Weight willing?
For rivers on the road system, or with minimal hiking, it makes sense to bring a full (heavy) safety kit. On a remote trip seeking whitewater, I’m willing to carry extra safety gear. Alternatively, we might commit to portaging big rapids as a compromise for carrying less safety gear.
Decision Factors: Equipment
PFD
Roman Dial, a champion of hiking packrafters, likes to point out that it was actually revolutionary to wear a PFD in the first place. “It wasn’t until I started putting [my] kids in packrafts wearing PFDs that I decided I needed a PFD, too.”
There is a full spectrum of PFD solutions:
- Type V Rescue vest: These ~5 lb vests feature high buoyancy, releasable harness, and pockets for rescue hardware. It’s important to learn how to use a rescue vest properly.
- Type III vest (3 lbs): These are the most common vests on the river, and rightly so. They lack the advanced features of a rescue vest, and most boaters don’t need those advanced features (in fact, using a rescue vest without training on how to use the vest can lead to serious accidents).
- Type III vest (1 lb): You can find certified Type III vests as light as 1 lb (0.5 kg). They aren’t as buoyant as the heavier vests, but provided basic needs.
- Inflatable: Inflatable vests, either marine, or from under your seat in the airplane, have CO2 or manual inflation valves. These vests have sufficient buoyancy, but are unlikely to stay attached during a swim through turbulent weather. They are not acceptable for use in rapid water.
- Unintended inflatable: Many packrafters have experimented with using other camping gear for their buoyancy. Mountain Laurel Designs briefly made a vest (The Thing) that could be filled with empty water bottles. On a 30-day trip with limited water hazard, we used sleeping pad foam as a vest. It is unlikely that these solutions would do any good in anything more than Class I water.
Helmet
Early in my packrafting career I complained to one of Alaska’s gifted kayakers, Timmy Johnson, about the cost of a whitewater helmet. Timmy said, “Yeah, it sucks to buy a helmet for every sport. But you want to be wearing the right helmet when your head is underwater.”
Whitewater helmets differ from bike and climbing helmets in several regards:
- Designed to withstand multiple impacts. For anyone else that has shattered a bike helmet, the value of a multiple-impact helmet is obvious.
- Constructed with materials designed to withstand long periods of water saturation.
- Harness system designed to prevent the helmet from shifting under hydraulic pressure, which can expose the forehead to impact.
- The short bill on whitewater helmets creates an air pocket over the face. This feature alone is worth the upgrade to a whitewater helmet.
- Whitewater helmets serve an important service on the shore too, protection on slippery rocks. A football size rock landed square on my helmet while I was scrambling around a Class V rapid in Alaska.
Other Equipment
Dry Suit
In addition to warmth, drysuits offer significant buoyancy. The whitewater endmember is a full suit with neck and wrist gaskets. A semi-dry suit can save some weight, is more comfortable, but can fill with water during a prolonged swim.
Rain gear can be effective in calm water, but you should plan to be wet and need fires to dry out. Be wary of stuffing your pockets with too many “essentials,” since these decrease your buoyancy. That said, it is a good idea to have lighter and satellite communication device on your body in case you get separated from your boat.
Throw Rope
A good rule of thumb is that, if you are going to scout rapids, you should have a throw rope. Anything under 55 ft. is flirting with not being practical. The “¼ inch rope is already pushing the limit of what can be held onto with cold hands, don’t be tempted to replace with smaller diameter.
Putting it All Together
Here are a handful of applications for this remote-gear decision matrix.
Remote Class II (Brooks Range, Alaska)

Remote, no hike, Class IV (Grand Canyon)
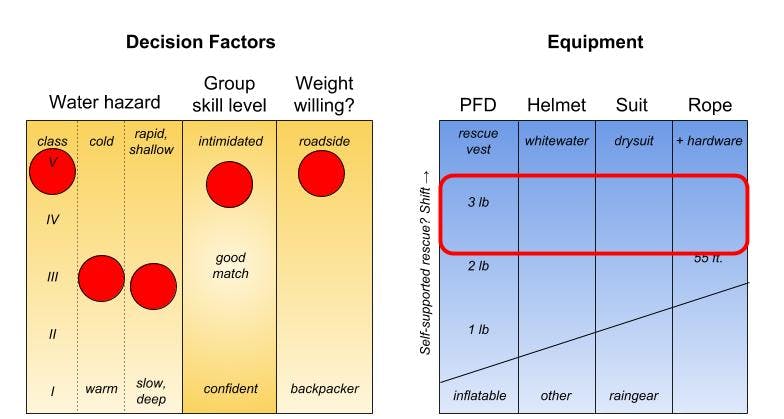
Local Class IV roadrun (Sixmile River, Alaska)

Fly-in Class III (Happy River, Alaska)
Fly-in Class IV Creek (Coffee River, Alaska)
Closing Thoughts, Portaging
Paddling technical water requires intentional strokes. Excluding safety gear from your trip should be intentional too, and justified. It can’t be overemphasized that the right thing to do is always carry a full set of safety equipment. But, in reality, we are all going to cut corners on remote trips. Choosing the right equipment for my adventures has become a calculated decision, which I’ve tried to capture in the decision matrix.
What’s missing from the decision matrix is the discussion with trip partners. Many of my remote destinations are intended as scenic trips, seeking travel rather than rapids, and we justify leaving safety equipment behind after committing to portage bigger rapids. Trips that are planned with the intention to run rapids always include more safety equipment.
If in doubt, portage! No other boat is as well suited for portaging. Embrace your roots, your inner backpacker, and strap that marvelous 8 lb boat to your pack.
Luc Mehl has been packrafting in remote Alaska for 15 years. He serves on the American Packrafting Association Education Committee and is an instructor for the Swiftwater Safety Institute. You can find Luc’s trip reports and trip planning guides at thingstolucat.com.
